Cube:Bit Magical RGB Cubes of Awesome

by 4tronix
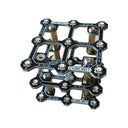
Magical RGB Cubes of Awesome. Lovingly hand-woven from pure Rainbow by Unicorns (ed: suspicion of hyperbole)

With many thanks for @LMcUnderwood for inspiring the product with her enormous Cubert 8x8x8 cube and coming up with the name Cube:Bit. Check out her blog here

These wonderful cube kits can be assembled in only a few minutes with only a small screwdriver. No soldering is involved.

Every cube is made out of pre-assembled slices that have neopixel LEDs on both sides to give an all-round effect to the lighting.

Learn about co-ordinates in 2D and 3D. Create wonderful visual effects and stunning indicators to sensory events on your micro:bit or Raspberry Pi

Use the Cube:Bit base available separately to provide power, connect your controller, or directly plug in a micro:bit or Raspberry Pi Zero (Full size Raspberry Pi work fine of course, but don't fit directly without using an extension GPIO cable, or simply 3 female-female jumper cables for 5V, Gnd and GPIO18)

With Raspberry Pi, use any of the neopixel code already available to drive your Cube:Bit eg. Pimoroni, Adafruit or 4tronix neopixel products.

With micro:bit 4tronix have written a special Makecode package that "knows" about the shape of all the cubes and can map from x, y, z co-ordinates directly to a pixel anywhere in the cube. Write to a whole plane of pixels at once, create a moving rainbow effect in only a few lines.

The possibilities are endless

Oh, did we mention that you can stack them, so you can make a tower as high as you like!

Dimensions:

  • 3x3x3 is 49mm on a side
  • 4x4x4 is 69mm
  • 5x5x5 is 89mm

8 customer reviews

2 years ago
I had pondered buying one of these in the past but didn't think I would use it much. I ended up getting one as a gift for a young child and wrote some additional demos for it. The recipient was delighted by the Cube:Bit so it must be good! The PCB approach means a lot of the light ends up going up or down rather than sideways but the Cube:bit is a decent approximation of a real cube with diffuse LEDS. And far, far easier to assemble with just a small screwdriver, of course. The programming is easy in MakeCode and is potentially a good way to learn about geometry in a practical, fun way. The MakeCode docs suggest not going above brightness level 100. I found the default of 40 was already bright and didn't feel the need to go above that. I wrote some articles on Instructables showing the demo code I wrote in MakeCode blocks using BBC micro:bit. All of it is parameterised so it's easy to switch to 3x3x3 or 5x5x5. Some of it is fairly complex despite being in MakeCode blocks. https://www.instructables.com/MakeCode-Fun-on-the-4tronix-CubeBit-an-RGB-LED-Cub/ https://www.instructables.com/Rainbows-in-MakeCode-on-a-4tronix-CubeBit-RGB-LED-/
by Kevin about Cube:Bit Magical RGB Cubes of Awesome via REVIEWS.io
2 years ago
Great item and well manufactured ready for an easy build - the 5x5 is a nice size but expensive even when on offer for all that it really is - 5 pcb’s with the led mounted both sides. Could do with a few more example/demo code lists to help those learning to get a quick start. Can be driven by a variety of controllers so very flexible.
by Ian about Cube:Bit Magical RGB Cubes of Awesome via REVIEWS.io
5 years ago
Great if you want an LED cube but don’t want the hassle of making your own. The 5x5x5 is amazing. Head over to 4tronix to check out the setup guide as it is slightly more involved that normal pi hats.
by Dominic about Cube:Bit Magical RGB Cubes of Awesome via REVIEWS.io
6 years ago
Well thought out and works well. A bit expensive but it does have 250 LEDs and that’s way more soldering than I can handle! I’ve used it with a Pi Zero and an ESP8266 - there’s a lot of example code for the latter on GitHub that’s pretty straightforward to modify to get it working with the Cube:Bit.
by Kevin about Cube:Bit Magical RGB Cubes of Awesome via REVIEWS.io
6 years ago
This works out of the box once fully assembled. Note 1: There is no instruction provided. Here is my list of instructions to assist you in assembling this correctly: 1. Essentially, you'll have a few screws, male pillars, and female pillars. 2. Start with the cubebit base and male pillars go to Ground and 5V. 3. Place Slice A on top of Cubebit. Slice A will face upward. 4. Female pillar goes on DIN. DIN Cubebit = DIN Slice A. 5. Screw DIN Slice A pillar. 6. Place Slice B on top of Slice A - Slice B now faces upward. 7. DOUT of Slice A now plugs into DIN of Slice B. 8. Do the same till 4th slice - where you'll use the all female pillars and screw in the top slice. To recap: - Cubebit DIN = DIN A - DOUT A = DIN B - DOUT B = DIN A - DOUT A = DIN B - DOUT B = DIN A - DOUT A = DIN A (all female pillars) I advise using a pi zero instead of the microbit because you can do cooler things like setting up a web server (Flask) and map the DNS to Dataplicity, and activate the cube based on an external event (like a click or a button activation on another pi). Note 2 : There are few screws and pillars left post-assembly. Those are redundant parts. Note 3: On the pi, you'll need to install the rpi_ws281x driver. This is already available in the UnicornHat package from pimoroni. Just run the following: \curl -sS https://get.pimoroni.com/unicornhat | bash You'll end up with a bunch of Unicorn hat files. Ignore them (but do get a UnicronHat or UnicornHat HD - they are fun to play with). Note 4: To install samples, enter the following in the terminal - wget http://4tronix.co.uk/cb.sh - bash cb.sh Play with the samples - purpleRain.py is fun. I advise cannibalising parts of the sample code to your Flask script to make the cube more connected. The Cubebit is extremely fun and versatile (when coupled with the rpi). Rock on!
by Shah about Cube:Bit Magical RGB Cubes of Awesome via REVIEWS.io

1 user photo