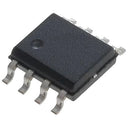
8MB PSRAM chip for Teensy 4.1


This PSRAM chip can add 8 Megabytes of RAM for use on Teensy 4.1
One PSRAM Chip for 8 MB Memory
The PSRAM chip is meant to be soldered to the smaller pads on the bottom side of Teensy 4.1, underneath the SD card socket, between pins 31-32 and 33-34. Do not use the larger pads. A single PSRAM chip must be solded to the smaller pads to be detected.
Two PSRAM Chips for 16 MB Memory
If 8 MB isn't enough, you can solder 2 PSRAM chips for a total of 16 MB.
Memory Test Program
After soldering the PSRAM to your Teensy 4.1, run this memory test program to verify the PSRAM memory really is working properly.
Documentation
Click here for the datasheet for this chip
Using PSRAM Memory
To use PSRAM memory in Arduino, add EXTMEM to large arrays or other variables you wish to be allocated in the PSRAM. These variables are not initialized and will contain random data when your program starts, so don't forget to set them to zero or fill them with the data you need before use.

-
8MB PSRAM chip for Teensy 4.1
COM0218Out of stock£2.50
Shop with confidence – we've been serving the hobbyist electronics, Maker, and retro gaming communities since 2012.
- Satisfaction or refund guarantee
- Worldwide shipping via mail or courier
- 57,000+ customer reviews
- Secure website and payments