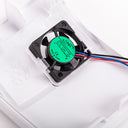
Raspberry Pi 4 Case Fan
by Raspberry Pi


The Raspberry Pi 4 Case Fan works with Raspberry Pi 4 and the Raspberry Pi 4 Case.
Designed for overclockers and other power users, it keeps your Raspberry Pi 4 at a comfortable operating temperature even under heavy load.
Features
- Fits perfectly into the lid of the official Raspberry Pi 4 Case
- Temperature-controlled fan delivers up to 1.4CFM of air flow over the processor, memory and power-management IC
- 18mm × 18mm × 10mm heatsink with self-adhesive pad improves heat transfer from the processor
Specification
- Input voltage: 5V DC supplied via 40-pin GPIO header on Raspberry Pi 4
- Fan speed control: Pulse width modulation control via user-selectable GPIO pin
- Maximum airflow: 1.4CFM
- Case Material: Clear PC
- Compliance: For a full list of local and regional product approvals please click here.
Fitting Instructions
- Insert Raspberry Pi 4 unit into the lower half (base) of the case, taking care to first remove any SD card, and to align the connectors with the apertures in the base.
- Insert the case fan into the upper half (lid) of the case, with the fan pointing away from the lid. The two tabs on the fan housing should fit neatly into the inside of the tabs on the lids, and the slightly curved edge of the housing should be flush with the underside of the lid.
- If you are also fitting the heatsink, remove the backing paper from the selfadhesive pad on the base of the heatsink, position it centrally over the processor and gently press it in position.
- Connect the wires from the fan to the Raspberry Pi 4 40-pin GPIO header as below
- Assemble the case.
| Lead | Colour | GPIO Pin |
|---|---|---|
| 5v | RED | 4 |
| Ground | BLACK | 6 |
| GPIO 14 | BLUE | 8 |
Checking status…
Ships today –
In stock – and ready to ship!
Coming soon – sign up for a notification!
Out of stock – hopefully back soon!
Retired – no longer available.
Pre-order – will ship once available.
-
Raspberry Pi 4 Case Fan
SC044810% off!£4.05was £4.50
Shop with confidence – we've been serving the hobbyist electronics, Maker, and retro gaming communities since 2012.
- Satisfaction or refund guarantee
- Worldwide shipping via mail or courier
- 57,000+ customer reviews
- Approved Raspberry Pi Reseller
- Secure website and payments