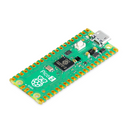
Pico Display Pack
by Pimoroni


A vibrant 1.14" IPS LCD screen for your Raspberry Pi Pico, with four useful buttons and a RGB LED!
We've sourced a new LCD screen especially for our Pico Display Pack - it's a lovely, bright 18-bit capable 240x135 pixel IPS display and fits the Pico perfectly. We've surrounded it with four tactile buttons so you can easily interface your Pico with your human fingers and an RGB LED that you can use as an indicator, for notifications or just for adding extra rainbows.
Pico Display lets you turn a Pico into a compact user interface device for a bigger project, capable of giving instructions, displaying readouts and even incorporating elaborate nested menus. If you'd rather use your Pico as a standalone device you could make a little rotating slideshow of images, display beautiful graphs from sensor data or build your own Tamagotchi or matchbox sized text adventure game.
A Raspberry Pi Pico is not included - you can buy one here!
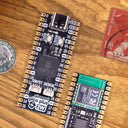
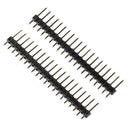
Your Pico will need to have male headers soldered to it (with the pins pointing downwards) to attach to our add-on boards.
Features
- 1.14” 240x135 pixel IPS LCD screen
- 4 x tactile buttons
- RGB LED
- Pre-soldered female headers for attaching to Pico
- Compatible with Raspberry Pi Pico/Pico W.
- Fully assembled
- No soldering required (as long as your Pico has header pins attached).
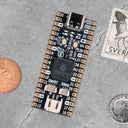
- Dimensions: approx 53mm x 25mm x 9mm (L x W x H) (dimensional drawing)
- Screen usable area: approx 25mm x 15mm (L x W)
- Schematic
- C/C++ and MicroPython libraries
Getting started
The labels on the underside of Pico Display will show you which way round to plug it into your Pico - just match up the USB port with the markings on the board.
The easiest way to get started is by downloading and copying our custom MicroPython uf2 to your Pico, it includes all the libraries you'll need to use our add-ons. The beginner friendly tutorial linked below will show you how to get to grips with pirate-brand MicroPython.
Pico Display also works very nicely with CircuitPython and Adafruit's DisplayIO library - look for the Display Pack ST7789 example in the library bundle to get started!
Pinout
Pico Display Pack communicates with the LCD display via SPI on pins LCD_CS, LCD_DC, LCD_SCLK, and LCD_MOSI. We also PWM the BL_EN pin (with gamma correction) for full, linear, backlight control. LCD_RESET is tied to the RUN pin on Pico so the LCD will be fully reset whenever Pico is.
The four switches are wired up as SW_A, SW_B, SW_X, and SW_Y.
There is also an onboard RGB LED (ideal to use an activity indicator!) which is also PWMed (with gamma correction) on pins LED_R, LED_G, and LED_B. If you want to use the LED pins for something else there are three cuttable traces on the underside of the board.
Power is supplied through 3V3 meaning that you can use Pico Display Pack both on USB power and from external supplies (from 1.8V to 5.5V) making it ideal for battery powered projects.

About Raspberry Pi Pico
Raspberry Pi Pico is a flexible, low cost microcontroller development board from the folks at Raspberry Pi, based on their very own chip - the RP2040. It's easily programmable over USB with C/C++ or MicroPython, and ideal for using in all sorts of physical computing projects, devices and inventions - we're so excited to see what you make with it!
We've called our Pico-sized add-ons packs, as they're designed to attach to the back of your Pico as if it were wearing a very stylish back pack (or a miniature jet pack, if you prefer). We've also got Pico bases (larger add-on boards with a space to mount your Pico on top) and some other boards that let you do interesting hackerly things like using multiple packs at once - click here to view them all!
-
Pico Display Pack
PIM543Out of stock£12.50
Add a Pico (or compatible) board
Don't forget the headers!
-
 Raspberry Pi Pico 2+ £4.00
 -
 Raspberry Pi Pico 2 W+ £5.50
 -
 Pimoroni Pico LiPo 2+ £12.50
 -
 Pimoroni Pico Plus 2 W+ £14.00
 -
 Pico Header Pack+ £1.50


Shop with confidence – we've been serving the hobbyist electronics, Maker, and retro gaming communities since 2012.
- Satisfaction or refund guarantee
- Worldwide shipping via mail or courier
- 58,000+ customer reviews
- Secure website and payments
