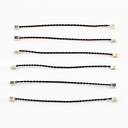
Noodle Adapters for Tiny FX (pack of 6)
by Pimoroni")
")
")
")
")
")
")
")
")
")
")
")
These handy adapters let you connect up our awesome LED noodles to Tiny FX , with minimal fuss and without soldering.
What's cool? LED Noodles. What's even cooler? Controlling them with Tiny FX so you can dim, pulse and flicker them on and off. New Hashima, here we come!
The connector that we've used for the noodles was judged 'super easy to use, with low insertion force but good retention' by @scottbez1 in his exhaustive noodle compatibility connector survey . The adaptors have built in resistors to protect the LEDs (and Tiny FX's outputs), so you don't need to worry about adding external ones.
LED Noodles, Tiny FX, and cables to connect the adapters to Tiny FX are not included. You can pick some up here.
Click here to view everything Tiny FX!
LEGO® is a trademark of the LEGO Group of companies which does not sponsor, authorize or endorse this product.
Specifications
- AVX 9276 connectors for connecting to LED noodles
- 2 pin JST-SUR connectors for connecting to Tiny FX
- Built in resistor (33 ohm)
- No soldering required!
- Dimensions: 20.0 x 5.3 x 6.3 mm (L x W x H)
Notes
- A typical noodle with these adapters draws 75-80mA.
- You can use these adapters in a few different ways, depending on what you're planning on doing with your noodles:
- You can plug in both ends of a noodle to a single adaptor, if a loop of LEDs is useful.
- You can use two adaptors (one at each end, making sure + and - match up to the correct ends of the noodle) if having you'd rather have the LEDs in a string.
- Or you can connect two noodles to two adaptors for extra brightness or to alternate between colours.
- To plug noodles into these adapters, align the metal contact to be horizontal with the adapter and push it into the one of the larger round holes. The noodle end with a hole in it should go into the connector side marked +.
- Unplugging noodles can usually be done with minimal force. If you find that a noodle is being stubborn and won't come out, grab a flat head screwdriver (or tweezers), insert it into the rectangular slit on the AVX connector, and wiggle it about. This will release the noodle letting you pull it out.
- When plugging and unplugging noodles, we'd suggest holding on as close to the metal end as you can - it's possible to snap the noodle if you pull on it directly.
-
Noodle Adapters for Tiny FX (pack of 6)
PIM751£8.25
Add cables and noodles!
Both necessary, both 'do not eat'.
-
 2 Pin Cables for Tiny FX (pack of 6)+ £3.25
 -
 LED Noodles (5 x 300mm)+ £7.50


Shop with confidence – we've been serving the hobbyist electronics, Maker, and retro gaming communities since 2012.
- Satisfaction or refund guarantee
- Worldwide shipping via mail or courier
- 58,000+ customer reviews
- Secure website and payments